


Gates G-Force CVT Belt Installation
To ensure optimal operation of newly installed belts, the CVT sheaves must be cleaned of all old belt residue, glazing, and oils. Cleaning can be accomplished by carefully scuffing belt contaminates off the sheave/belt contact area with a mild abrasive such as 220-400grit sandpaper, Scotch Brite Pad, or Steel Wool. Follow up by cleaning the surfaces thoroughly with soapy water and or brake cleaner until all impurities have been removed. Cleaning the sheave surface until all contaminates have been removed is vital to future belt and CVT operation. If any particles remain, belt slip and a noticeable drop in vehicle performance can occur. If a belt is to be removed and reinstalled during future maintenance, it is highly recommended that the belt is reinstalled in the same direction as before to match belt wear profile to contact with the corresponding sheave profile.
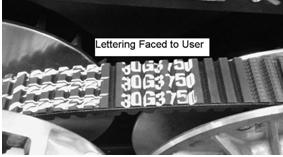
Although G-Force belts are not directionally biased, it is recommended to install them with the label lettering facing toward the user to keep belt reinstallation consistent.
 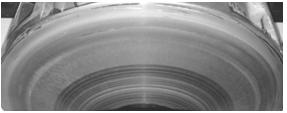 Clean Sheave Plates
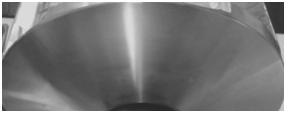 Dirty Sheaves should be cleaned with a mild abrasive to remove rubber and other wear contaminates as shown above by dirty Sheave. Dark wear patterns must be removed from the surface then cleaned off with an alcohol agent or brake cleaner to remove fine particulates.
New Belt Break In Process:
New CVT drive belts require a break-in period of at minimum 30 Miles to maximize belt life and performance. The goal of the break-in period is to properly wear in the belt to match the sheaves before applying maximum engine torque. By conservatively running through the entire shift range, proper belt contact over the entire sheave/belt contact path is optimized to eliminate belt slippage and drastically increase the belt’s lifespan.
Follow the following guidelines to accomplish proper Belt-Break in:
-Vary vehicle speed and engine RPM to shift belt through normal operational range.
-Do not exceed ¾ throttle within the first 30 miles of installation
-Stop engine and allow belt to cool down every 15 minutes of use.
During break in period, the following activities SHOULD BE AVOIDED:
-Aggressive Acceleration or ‘Jerky’ throttle movements at low speeds
-Holding engine/vehicle speed constant for extended time periods
-Pulling Heavy Loads
-Long run times without complete CVT/belt cool down
By following the break-in process carefully, the belt surface will wear in to match the individual CVT sheaves to maximize grip performance and dramatically reduce heat, glazing, and future wear.
|
|